Photo Restoration Before & After: Studio QA Checklist
Photo restoration before and after starts in QA, not at the end
Clients don't judge restoration work at arm's length. They zoom in. They check whether skin tone holds at the cheek, whether a scratch actually vanished or just got blurred into mush, and whether the background looks naturally cleaned rather than smeared into oblivion.
That's why the strongest studios treat photo restoration before and after as a guided process, not a last-minute comparison screenshot. Preserve identity first. Remove damage only where it hurts readability. Keep the "after" consistent with how the original photo should feel. When you work this way, approval takes less time because expectations stay aligned from the start.
Build your quality control workflow around what clients actually review
Most studios think QA means pixel inspection. That's part of it—just not the expensive part. The costly issues surface earlier: inconsistent cropping, shaky upscaling, or background reconstruction that shifts the photo's depth cues. Clients catch these fast when the photo restoration before and after no longer matches the original's character.
Start with capture settings that prevent avoidable artifacts
Scan resolution quietly determines how "real" the restored result feels. Scan below your intended delivery level and noise becomes "detail"—AI will faithfully enhance the wrong signals.
For printed family photos, use a 600 DPI flatbed scan for originals up to A4. If a client sends a torn 1940s portrait, scan the intact sections first, then capture the torn areas separately. That separation makes it far easier to align reconstructed regions during restoration.
When restoring with tools like RestoreGram, plan before you enhance. RestoreGram handles the technical heavy lifting, but your quality control workflow still determines whether skin texture looks believable, geometry stays faithful, and scratch removal avoids those telltale "waxy" transitions.
Run a damage map before you touch color or facial features
Before enhancing anything, document what's actually wrong. Use a checklist covering scratches, creases, dust, fading, and edge loss. For each category, define what "good" means for that specific photo.
A faded graduation picture might need contrast restoration without over-saturating uniforms—muted dyes in the scan shouldn't suddenly become vivid. A scratched image might call for removing the worst marks while preserving faint background grain, since grain helps the result avoid a "generated" look.
Standardizing these steps also speeds up QA comparisons. When the workflow is consistent across operators and orders, decisions come quicker with fewer subjective back-and-forth rounds. If you're also resizing deliverables, a simple image resizer tool can validate target dimensions early instead of late.
QA checklist: the pass-by-pass test
Strong QA runs like a process, not a memory test. Pass-by-pass checks give each issue a clear source—and tell your team exactly what to redo without reworking everything.
Pass 1: Technical integrity
- Edge continuity: Zoom to 200% and inspect hairlines, collars, and eyeglass rims. Where scratches intersect high-contrast borders, AI sometimes "floats" edge shapes.
- Halo artifacts: Check for bright rims around faces after background cleanup. If you spot one, reduce edge enhancement strength and review the transition zone.
- Upscale correctness: Confirm delivered dimensions match the brief. Keep one resizing pipeline per order so QA results stay consistent.
Pass 2: Restoration realism
- Skin tone sanity: For monochrome originals, verify grayscale-to-color results under neutral lighting. Cheeks becoming overly uniform is the most common flag, especially when faded blush was present in the scan.
- Fabric texture: Make sure denoising doesn't erase suit weave or dress texture into smooth gradients. Over-smoothing triggers revisions faster than almost anything else.
- Background coherence: Reconstructed backgrounds should match plausible blur and depth. If one subject's "after" looks sharper than the rest, the whole set reads as inconsistent.
If colorizing is part of the job, pair your QA with a disciplined color approach. This colorization guide covers techniques that keep colors believable around faces, hair, and period clothing.
Pass 3: Client approval steps
This is where teams rush—which is exactly why it's worth structuring. For client approval steps, send one clean packet: the restored "after," the original "before," and a brief note summarizing what you corrected. If you changed the crop or reconstructed missing regions, say so directly.
Use a two-tier approval structure:
- Technical confirmation: "Is the face and framing correct?"
- Aesthetic preference: "Do you prefer natural vs. slightly enhanced color/contrast?"
Preventing revision cycles: what to document before delivery
Revision requests almost always trace back to misunderstanding. Studios that handle this well treat each order like a small contract, not just a file upload.
Create a one-page internal log per job: scan resolution, crop decisions, whether background reconstruction was used. If you're using RestoreGram, record the outcome in plain language—"restored scratches + stabilized contrast" or "removed dust + enhanced facial detail." When a client asks why a specific area looks different, you can explain without guessing.
Use trust language for missing information
When edges are gone or damage is heavy, AI reconstructs based on context. Clients deserve clarity about what's faithful restoration versus inference. Try: "I restored the missing area based on surrounding context. If you'd prefer a more conservative result, we can reduce reconstruction strength." Offering options prevents churn.
Watch for over-sharpening too. Aggressive upscaling can bring pores and scratches back as false "texture." Before adding sharpening, revisit denoise settings and refine edge masks.
Capture consent for preservation vs. modernization
Some clients want a time-capsule feel; others want a clean, modern print. Offer two looks—or at least two intensity options—and confirm preferences during approval, before you finalize the photo restoration before and after set.
For preservation-minded work, QA should emphasize gentle contrast restoration and minimal background reconstruction. If the goal is archival, align your approach with best practices from this photo restoration guide.
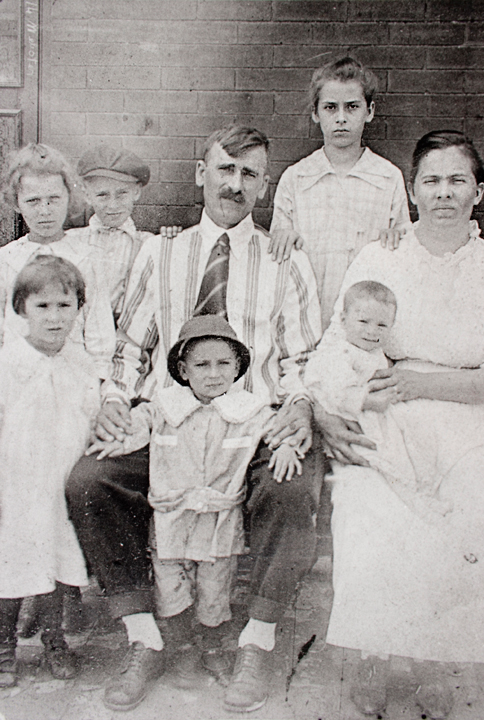
Before Restoration
Faded, grainy, and deteriorated vintage photo

After RestoreGram
Vibrant, clear, and beautifully restored

QA works best when it's measurable. "Is the crop consistent?" "Do halos exist at 200% zoom?" "Is texture believable on fabric?" If you can point to it, you can fix it without arguing.
Restore Your Photos Today
Try RestoreGram's AI-powered photo restoration. Used by studios worldwide.
Try RestoreGram Free →